Create Your Own Trainer - Part 2
Creating The Visual Studio Project - Part 2
The final step is to select Build from the main menu, show in the screenshot immediately below, and then choose Build or Rebuild Solution.
If all goes well, your project will compile properly and you will get this message at the very bottom of your screen:
========== Rebuild All: 1 succeeded, 0 failed, 0 skipped ==========
If all also went well when loading GTA 5, hitting F3 in game will show you this simple menu. This is just the start of course and we can change the key from F3 to another key as we will see later.
Optional Steps
Throughout this tutorial, and the site in general, clicking on an image will provide you with a much bigger and easier to read image.
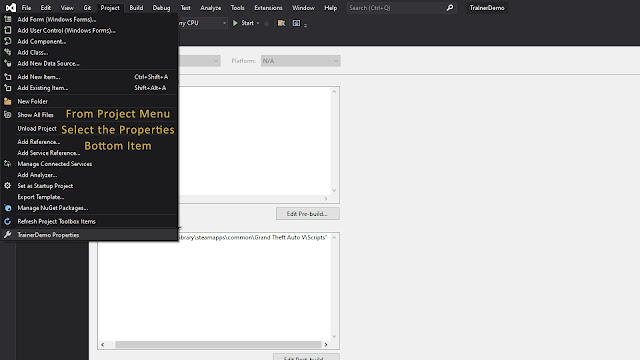
To simplify the process, we can have Visual Studio automatically place our compiled project, which will be called TrainerDemo.dll by default, in our GTA 5 scripts folder. So
we add this following step. From the Project Menu, select the
Properties for our project at the very bottom. For our demo it will be
displayed as TrainerDemo Properties.
Then, from Build Events, add this line of code, replacing the path to your GTA 5 scripts folder. with your own: COPY "$(TargetPath)" "P:\SteamLibrary\steamapps\common\Grand Theft Auto V\Scripts"
Finally, we can go to our GTA 5 Scripts folder and check to see if your TrainerDemo.dll is indeed compiled and present there. We can see it as the last item, the selected one, in the screenshot below.
If you didn't copy the starter code for our menu template above, you can get it here. Just copy and paste it to replace the code that Visual Studio had as its default.
Go back to Part 1 of the tutorial


